Working with Poly-L-Lysine in Cell Culture
Introduction
In my master’s thesis project, I work with Poly-L-Lysine (PLL) almost every week, primarily for cell fixation, and microgel surface coating.
The structure of PLL is quite simple, as shown in the figure below.
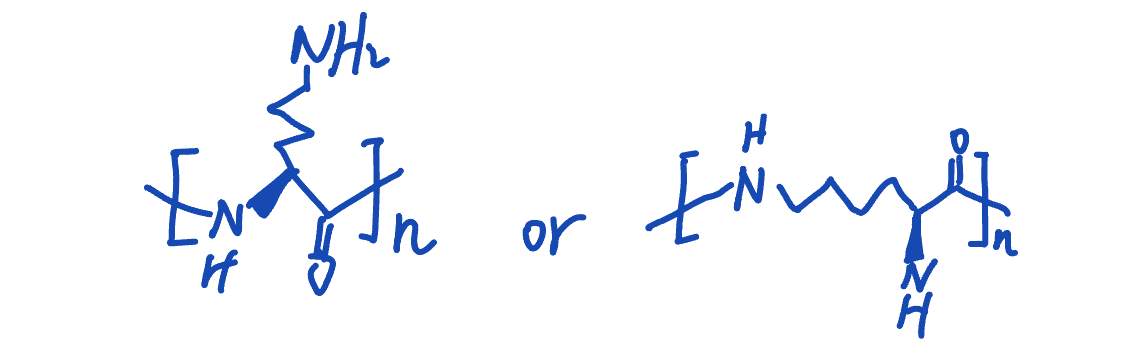
Each lysine monomer contains two amine groups, allowing two possible polymerization modes:
α-Poly-L-lysine – formed via dehydration condensation between the α-amino group (on the α-carbon) and the carboxyl group of another lysine molecule.
ε-Poly-L-lysine – formed via linkage between the ε-amino group (on the side chain) and the carboxyl group.
In our lab, we use α-poly-L-lysine, which is commonly applied in biological and biomedical research for cell adhesion and coating purposes. The ε-isomer, in contrast, is widely used as a natural antimicrobial preservative in food products, as noted in Wikipedia 1.
Using PLL for Cell Adhesion
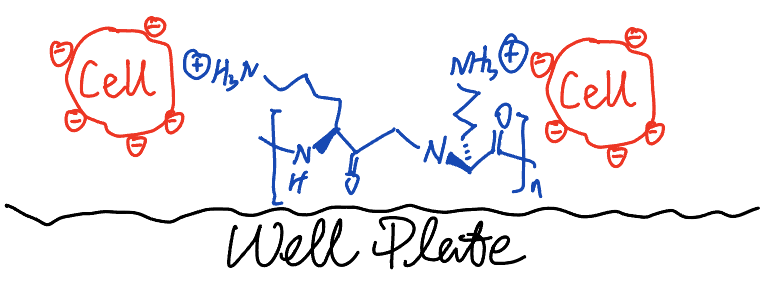
As I mentioned in my first post, I encountered a problem about PLL when trying to stick cells to the bottom of the well plate, where PLL works as a “glue”, as shown in the illustration below.
General Coating Protocol
There’re different protocols for coating the well plates with PLL, some suggest to leave PLL solution on the well plate for several minutes to hours, some suggest keeping overnight, some don’t mention anything about remaining time, because it’s too detailed for publication. Most PLL that we can purchase are from Sigma-Aldrich, which offers more than 5 different products. Generally, they suggests a following protocol 2:
- Add 50 mL of sterile tissue culture grade water to 5 mg of poly-lysine to make 0.01% (w/v) solution.
- Aseptically coat culture surface with 1.0 mL/25 cm2. Rock gently to ensure even coating of the culture surface.
- After 5 minutes, remove solution by aspiration and thoroughly rinse surface with sterile tissue culture grade water.
- Allow to dry at least 2 hours before introducing cells and medium. (Step 3 and 4 might not be necessary 3)
Why the standard protocol failed for our case
Sigma also notes in their protocol: “Optimal conditions must be determined for each cell line and application.” It’s true, this protocol doesn’t always work well in our case. The likely reason is that our microgels were already pre-coated with PLL, so there are positive charges on both sides (Most cells have negative charge at the surface, so PLL should be working perfectly for them). After several frustrating rounds of trial and error — and losing far too many cell samples during the numerous washing steps after fixation (and sometimes even before fixation) — we developed a protocol suitable for our microgels.
Our Protocol for Microgels
Note: This is not recommended for normal cell culture due to high PLL concentration and possible cytotoxicity.
- Add 60 μL 0.01% PLL to 96 well plate.
- Left the well plate in 65 °C oven or hot plate for 3 hours to evaporate the solution completely.
- Add cell samples to the well plate, and let them settle for 20 minutes, during the time centrifugation can also be applied to reinforce the sticking process.
Choosing the Right PLL Formulation
Product composition – Remember to check the ingredient list. For example, Sigma-Aldrich’s PLL (P8920) contains the preservative ProClin to prevent microbial contamination. It is not sterile upon purchase and is therefore unsuitable for long-term cell culture.
Molecular weight – Commercial PLL is typically available in ranges such as 30–70 kDa, 70–150 kDa, 150–300 kDa, and >300 kDa. In theory, higher molecular weight PLL provides stronger adhesion. However, too high molecular weight can cause cells to shrink upon adhesion to the well plate. In practice, there is often a trade-off between adhesion efficiency and cell morphology.
Salt form – PLL is usually supplied as the hydrobromide (HBr) salt. The HBr form keeps PLL crystalline and water-soluble 4.
Alternative options – If the cells can rapidly degrade PLL, poly-D-lysine (PDL) may be used instead 5,6. Because PDL is not a naturally occurring amino acid polymer, it is resistant to enzymatic digestion by trypsin and other proteases.
References
[1] Poly-L-lysine. Wikipedia. https://en.wikipedia.org/wiki/Poly-L-lysine
[2] Sigma-Aldrich. Poly-L-lysine Product Information and Protocol. https://www.sigmaaldrich.com/DE/en/technical-documents/protocol/cell-culture-and-cell-culture-analysis/3d-cell-culture/poly-lysine-product
[3] Faussner, A., et al. (2021). Poly-L-lysine coating is not always required for cell adhesion: reconsideration of standard protocols. PLOS ONE, 16(12), e0260173. https://doi.org/10.1371/journal.pone.0260173
[4] Sigma-Aldrich. Poly-L-lysine Hydrobromide (P4832) Product Page. https://www.sigmaaldrich.com/DE/en/product/sigma/p4832
[5] Sigma-Aldrich. Poly-D-lysine (P6407) Product Page. https://www.sigmaaldrich.com/DE/en/product/sigma/p6407
[6] Thermo Fisher Scientific. Poly-D-lysine Coating Solution (A3890401) Product Page. https://www.thermofisher.com/order/catalog/product/de/en/A3890401